Software Development Guide Using Git as a Management Tool
In software development, version management is inevitable, and Git is a tool used for version control of code files. Although Git has other functions, this section will focus on introducing the common workflows for software development projects that use Git as a code management tool. For example, various open-source projects on GitHub or internal development projects within certain organizations or companies. The workflow introduced in this post will use the GitLab platform as an example to demonstrate the most common, fundamental, and universal workflow that follows a similar process across different platforms or tools, with only differences in operation names and specific tools.
Additionally, this guide is intended for audiences who need one or more of the following elements: code management, version control, code collaboration, software development, Git, development process, and project maintenance. If none of these elements are within your needs, then you are not the target audience for this guide.
Prerequisites
This guide requires you to have some prerequisite knowledge and complete some basic operations:
- Download Git
- Understand what terminal/command line/shell is and be able to execute commands in it
- Use Linux or Mac OS
- Have written code before
- Have access to at least one Git-based code management platform such as GitHub, GitLab, Gitea, etc.
It’s beneficial to understand some concepts, although not necessary:
- Graph
- Hash code
Common Git Operations
Initialization
When using a tool to manage a set of code, we need to let the tool know which code it should manage. For Git, this command is:
git initThis command will treat the folder where you run this command as a Git repository, which is the place that needs to be managed by Git. Whether you’ve already written some code and want to start using Git to manage it, or you want to start using Git to manage an empty folder, you can use this command.
Obtaining an Existing Repository
For code repositories already managed by Git, you can use this command to download them to your local machine:
git clone <git_url>Replace
with the address of the code repository you want to obtain. This will download the corresponding code repository to the folder where you run this command.
Basic Configuration
In many cases, using Git means you might need to collaborate with others on the same code repository. You need to tell Git the identity of the current developer using the following commands:
git config --global user.name "[name]"
git config --global user.email "[email address]"
Note that these two commands are global configurations, meaning all Git repositories on this device will record changes with this identity by default. So if the device you’re configuring isn’t your personal device, or if you might submit code to different repositories with different identities, don’t add the
--globaloption.Sometimes, you may have been developing locally with Git for a while and want to upload the code repository to a platform. That platform not on your local machine is generally referred to as remote/server or just the name of the platform. When you want to specify the remote address for your current local repository, use:
git remote add origin [url]This command means setting the code repository at url as your current repository’s remote repository named origin.
Git is a tool for version control of code. Its application scenario is to manage text content with line breaks, which means Git should not be responsible for managing other types of files and cannot manage other types of files well.
Common examples of files that should be managed by Git: source code, text files with line breaks, configuration files with line breaks in various formats, document text with line breaks, and configuration files common to all developers.
To explicitly tell Git which files it shouldn’t (directly) manage, you can use some features or tools:
.gitignorePlace this file in the git repository and fill it with conditions that files that need to be ignored by Git should meet. Unless explicitly required to be recorded by Git, Git will not track any files mentioned in this file.git-lfsFor some large files that don’t change versions frequently but need occasional iterations, such as images in documents, you can use git-lfs to manage them.
Making Changes
Pull all the latest records from the remote:
git pullMark a file as ready to record its changes:
git add <file-name>Save all currently marked files to the history record and add a message. This operation is called a commit:
git commit -m "[descriptive message]"Each commit, Git creates a snapshot of all files marked for management. Different commits in Git are represented as separate nodes with a sequential relationship between nodes.
Push the records on the current branch to the remote repository:
git pushIn a graph of many commits, each linear chain of commits is called a branch. You can flexibly switch the current development location, delete branches, etc., through some commands.
Switch branches:
git switch <branch-name>Create a new branch:
git branch [branch-name]Delete a branch:
git branch -d [branch-name]
When we want to mark a commit as a special status or version, we can use the following command to tag the current commit:
git tag <tag-name>After creating a new branch, use the following command to push it to the remote:
git push origin <new-branch-name>
git push -u <remote-branch-name>
Each branch always comes from some existing commit. When we want to change the checkout point (the commit from which the branch was checked out) of a branch, we can use:
git rebase <branch-name>
git rebase -i HEAD~[n]
When we understand Git’s organization from a graph perspective, our current operations on the content managed by Git are actually using a cursor called
HEAD, which points to different nodes (commits) in the Git graph.When using git rebase
, this means moving the checkout point of the current branch to the latest position of . HEADrefers to the commit corresponding to the current development position.If the
-ioption is used, this means the rebase process is interactive, and you need to dynamically modify the rebase configuration file that Git feeds back to you to modify the operations you want to perform for each specific commit. The meaning of each option appears in the feedback configuration file, please read it carefully. The most common options used arepickandfixup.pickmeans to keep the selected commit and message, whilefixupmeans to merge the corresponding commit with the one before it and discard this commit message.Stash the content in the current working area that has not yet been committed:
git stash
# View stash / Apply the last stash / Discard the last stash
git stash list/pop/drop
Viewing Information
- When you want to check the status of the current repository, such as which files have been submitted, which ones have been changed, etc., use:
git status
Git’s underlying identification of all files and commits is done through the corresponding hash code, so most operations in Git that need to specify branch names or other names can be specified using hash codes; at the same time, when checking the status, you can also check whether the hash code is consistent to determine whether the current commit is consistent.
Check the current branch:
git branchView the current development record:
git log
Workflow
A complete and ideal Git graph of a large repository looks like this:
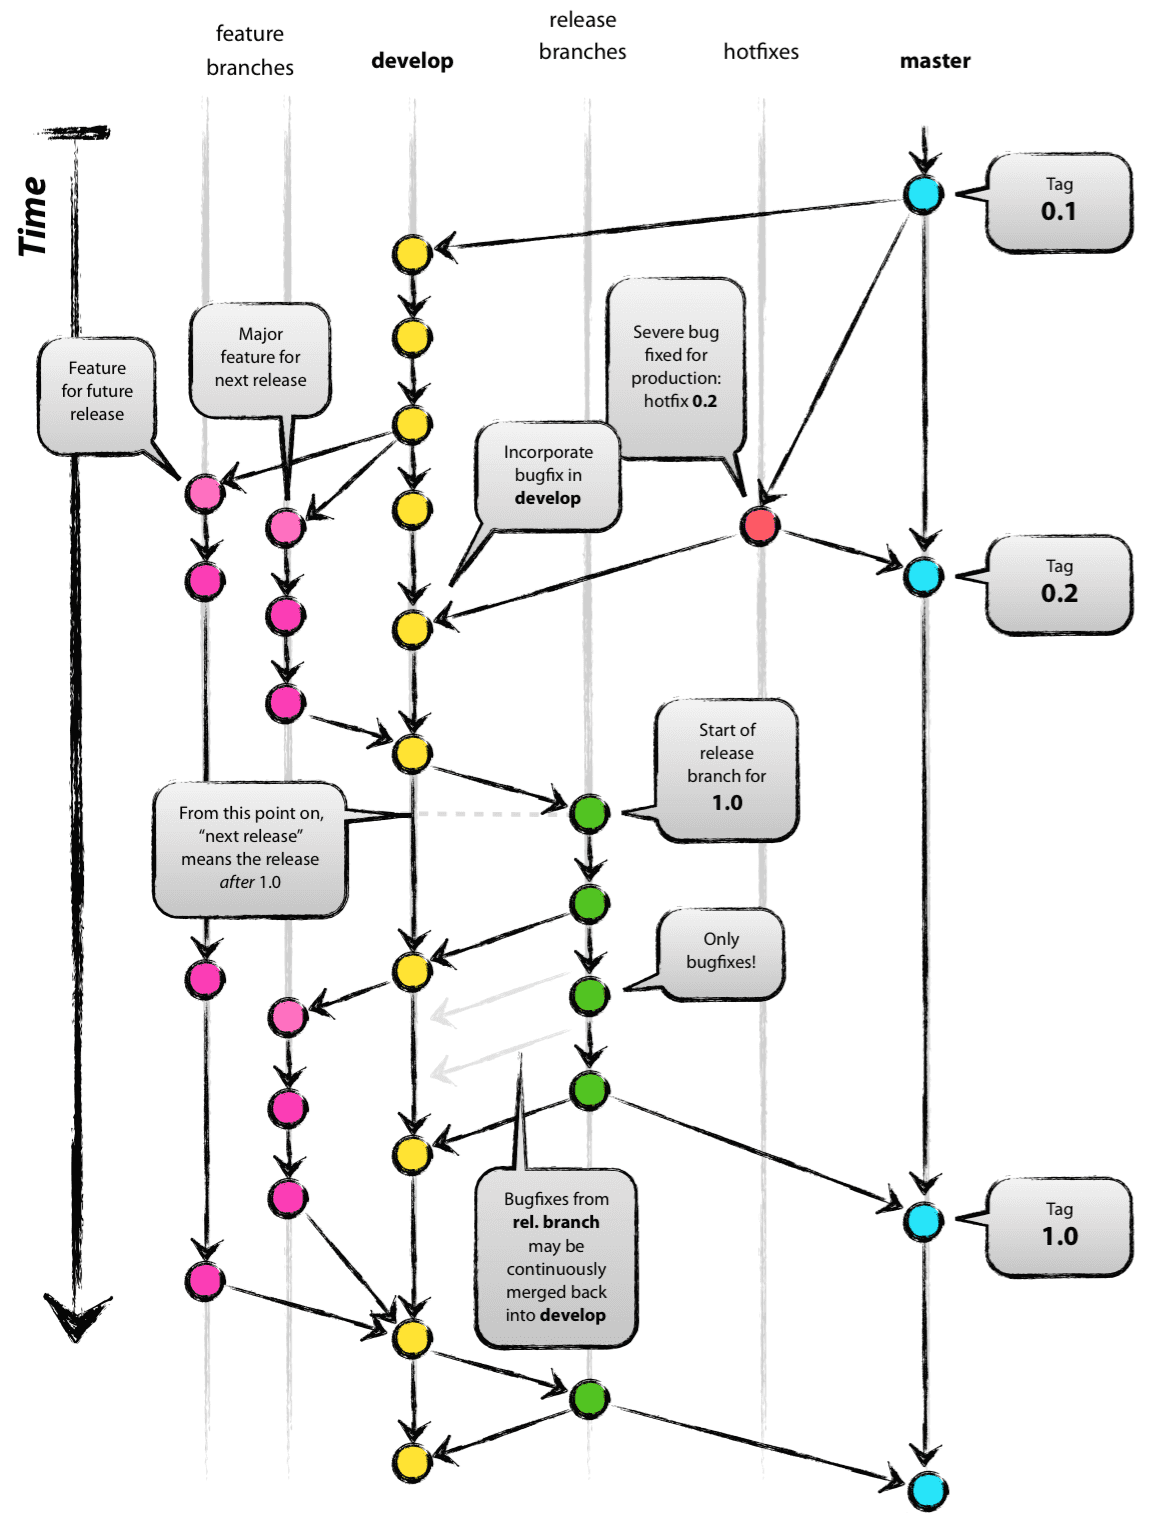
This picture means:
- The
masterbranch contains only critical, important versions. - The
developbranch is responsible for the maintenance of all feature branches, and all new feature development will be merged into feature. - When it’s decided to release a release, the specified state of
developwill be transferred torelease. Thereleasewill undergo comprehensive testing and necessary bug fixes. After confirmation, the confirmed state will be merged intomasterandtagged.
In most small and medium-sized projects, such a complete development flow is rarely needed. Generally, the above model will be simplified to only two main parts:
- A main branch that maintains progress
- Various branches being developed for features, tests, fixes, etc.
So the definition of each branch during development will become: (Don’t focus on the branch name, focus on its function. In different organizations, institutions, and companies, naming conventions may vary, but the functions are basically the same.)
- One branch is used to maintain all well-developed features, and various features from development can only be merged into this branch. This branch might be called
masterordevelopor a special project nameproject_name. We will temporarily call itmasterbelow. - Each
featureorbugfixwill be checked out frommaster, and then actual development is carried out. After the corresponding content is developed and passes various tests, it can be merged back tomaster. - Every so often, the maintainer will decide whether to release a release based on the development status. If so, directly tag the corresponding commit on
master, and publish the state corresponding to the tag as a specific version of the release.
Developer Perspective
This section describes the most basic workflow from a developer’s perspective if you want to join the development of a project.
Clone the source code to your local machine
Use
git cloneto pull the code that needs to be developed to your local machine. Then configure your Git personal information.Develop in a new branch
First use
git switchto switch to the branch you want to develop on, which is generallymaster. Then usegit checkout -b <new-branch-name>to create a new branch from the branch you want to develop on. Remember to follow the branch naming rules required by the project.Make changes and test
Complete some independent and complete feature development on this branch, and then test it after development. Please remember to follow the coding style of your development language and other possible code specifications.
Submit changes
Use one commit to submit each complete independent feature. If you have some temporary commits mixed in during development, please use
git rebaseto organize your submission record, ensuring that each commit is complete and independent, and uses Good commit message or follows the project’s commit message requirements. In addition, for specific projects, you may also need to update CHANGELOG, documentation, or other files.Push to remote
Use
git pushto push the completed code to the remote. Before submitting a Merge Request or Pull Request, you generally need to ensure that the branch has been rebased to the latest situation of the target branch to maintain a linear development history.Submit Merge Request or Pull Request
On the corresponding code platform, submit an MR or PR. Fill in the information clearly according to the project’s requirements, and choose the tags specified by the project. Change the reviewer to the person specified by the repository or the maintainer. If the MR is ready, assign the person required by the project or the maintainer; if not completely ready to be reviewed, assign yourself.
Wait for the server’s automated check process to complete. If some necessary automated checks do not pass, please modify your code according to the reasons for not passing. Repeat steps 2-4 until all necessary automated checks can be passed.
These automated checks will generally be displayed as a red or green icon indicating the status. They might be called CI/CD, pipeline, action, etc.
Wait for the reviewer to provide feedback.
If there are places that need to be changed, repeat steps 2-4 according to the opinions. After the changes are completed, reply to the person who made the suggestion, clearly indicating that the changes have been completed, until the reviewer thinks there are no problems.
- Wait for the PR or MR to be merged. A single development is now complete.
- Continue to use the project, submit detailed problem descriptions to the issue area when you find problems. Or continue to complete the development tasks assigned to you by the maintainer.
Maintainer Perspective
This section describes what you need to do to maintain the project’s workflow from a maintainer’s perspective if you become the maintainer of a project.
- Make sure the project you maintain has provided clear guidelines to guide developers to submit code that meets your inner requirements correctly.
Set up necessary automated check processes for your project.
For ordinary submissions, these automated checks might include: static checks for code, format and spelling checks for text and code, checks for the compilability of certain code, checks for the provision of required information, tests for code, and whether the branch content is up to date.
For merged, tagged submissions, these automated processes might include: automatically closing related issues or other external platform resources, automatically publishing related code or built products to the required destination, automatically updating certain descriptions, documentation, or versions of running software, etc.
- Wait for all automated checks to pass for newly received PRs or MRs.
Assign appropriate reviewers for code that needs to be reviewed (generally just yourself for small projects) to check all content that needs manual checking.
For example: whether the solution to this problem is necessary, whether the target branch is correct, whether the code implementation is correct and efficient, whether necessary comments or explanations are provided, whether text content that should not appear (insulting vocabulary, risky implementations, etc.) appears.
After the inspection, guide the developer to complete the relevant fixes until there are no problems.
Merge the branch to the target branch.
When merging, you may need to pay attention to: whether all commits in this MR or PR need to be merged into one commit before merging, whether a merge commit needs to be generated, and whether the branch needs to be automatically rebased to the latest.
Update in a timely manner according to the project situation:
- Development guidelines and related documentation
- Close resolved, unnecessary issues
- Assign appropriate developers for issues
- Check the progress of MRs or PRs
- Configure necessary automated check processes
Common Development Standards
The following are some common, general development standards. Different specific requirements may exist in specific projects, and the specific project’s requirements should be followed. But when you create your own project, or when the project doesn’t have rules yet, using these rules is a good start.
Good Commit Message
A commit message must be brief and clear, without ambiguous or repetitive, vague expressions. Please refer to the following link: https://wiki.openstack.org/wiki/GitCommitMessages#Information_in_commit_messages
Of course, in some projects, commit messages may also need to meet some format requirements, in a standardized form, or to enable some automated tools to automatically extract information from them. Specific situations should follow the requirements of the specific project.
Branches
Use different prefixes to name different branches. Common branch prefixes are as follows:
feature/: Branches that developed new features or related changes.bugfix/: Branches that fix bugs, for example: bugfix/missing_validation_checkbackport/: Operations that apply changes to previous versions.wild/: Other branches not included in the above, such as temporary branches, test branches, etc.
In some projects, you may also need to add the developer’s name or the name of the development sub-project or sub-module in the prefix:
prefix/your_name/usage: Also need to add your (developer’s) name in the prefix to clarify branch ownership, for example:feature/changshan/socket- If a code repository contains multiple sub-projects, sub-modules, or multiple development directions, you need to specify the sub-project being developed. For example, if there is a sub-project called
fire, then the branch developing a feature for it should be namedfeature/fire/<the-feature-name>
Versioning
To understand and identify software development progress, we sometimes tag code to identify the current software version. The definition of the version should follow the rules: Semantic Versioning 2.0.0
CHANGELOG
Changelog is used to record code changes, and its use follows: Keep A Changelog 1.0.0
Common Questions
Is this really common/xxx? In the past at xxx, it wasn’t like this.
Yes, you are right.
How to configure some automated check processes?
I want to add an empty file to Git, how do I do that?
Add an empty file named .gitkeep in the folder: touch .gitkeep
Are there any recommended Git-related VSCode plugins?
Gateway to Other Related Needs
If the content in this article is fully understood and mastered by you, but still cannot meet your development needs, then you should already be a developer with the ability to search and learn. Here are some possible technical solutions or tools for common advanced needs. You can search for relevant materials on your own based on the links or keywords provided.
- A successful Git branching model
Apply one or more existing commits to a specified location
git cherry-pick: https://git-scm.com/docs/git-cherry-pickTools to perform some automated checks and modifications before committing
pre-commit: https://pre-commit.com/
Permanently delete some files from Git’s history, for example, when large binary files were accidentally committed to Git causing repository size explosion
git-filter-repo: https://github.com/newren/git-filter-repo/?tab=readme-ov-file. The general operation is to first install this Git plugin from pip, then use
git filter-repo --analyzeto analyze the repository structure, and then usegit filter-repo --invert-paths --path <path>to remove all matching paths.